Thursday, February 11, 2010

The Care and Feeding of a Sourdough Starter


THE SUM TOTAL OF MY STARTER KNOWLEDGE

I am doing some prep work on a sourdough bread class, and found a couple of really good web sites on sourdough starter...  how to make one, how to feed one, and things to watch for.  I thought I might share these sites with you, along with my total knowledge of starters, which is not much.

This is the thrift store crock that I keep my starter in.  
If I put it in the fridge, I use a a glass jar.

  • It is simple to keep a starter alive.  
  • Both getting a starter from a friend and making your own are effective.
  • Some sourdough breads call for dry yeast - you can probably omit that step if you add in a 12 hour "rise" - the sourdough just takes longer.  That is fine if you are doing the entire "slow foods" type of meals.
  • You shouldn't use reactive metals around sourdough starter.  Use wood, glass or ceramic (I am NOT going to recommend plastic for obvious reasons).
  • If you use your sourdough 2-3 times a week, you can leave it on the counter and just feed it every day or two.
  • If you are not going to use it for a couple of days you should put it in the fridge.
  • If it gets a black "liquid" on top, that is normal.  Just stir it in or pour it off - your choice.
  • Add equal parts (by weight) of flour and water to feed your starter (about 3/4 cup of water to each cup of starter)
  • Lumps are OK.
  • If you have too much starter and you are not ready to make bread - make pancakes or waffles or bottle some up to share with a friend.
  • If you have starter with one type of flour and you want to switch to another type of flour..... just go ahead.  Within a couple of "feedings" your starter is converted.
  • I keep a "white" starter in the back of my fridge for my friend.  I feed it a couple of times per month. 
  • I keep a "whole wheat" starter in the back of my fridge for emergencies - a couple of times a month I stir it into my current starter.... then bottle some back up the next day.
  • You need to feed your starter more when it is warm.  In the summer I feed it more often - but we don't do A/C and we do wood heat - I don't put the starter by the stove so it stays cooler and is a little happier.
  • If I leave my starter on the counter too long and forget to feed it... it gets disgusting stuff on the top.  I usually just skim off the yucky stuff and feed the starter a little bit twice a day until it looks good again.  If it is worse than even I can stomach, I pull my "emergency" starter out and start again.
  • I like to label my starter (and everything else).  My fridge is starting to look like a science fair.
  • Have fun and don't stress too much.  Properly developed sourdough starters are pretty resilient and don't require too much from you.  It is kind of like a low maintenance pet....a little more work than a pet rock and a little less than a fish.
Enjoy
Cindy
This is my active starter
I have a lot going so I can share at the class.


Some appropriate Links:
Breadtopia - Sourdough Starter Management
Wild Yeast Blog - English Muffin Recipe I am going to try.
Sprouted Flour Recipes and Ideas

Let me know how your bread turns out!  If you come up with a great recipe, we would all love for you to share it with us.  Pictures are great.  Be healthy and well.


The House Around the Corner - Bobbi Jo - Starter

Sourdough Starter Recipe:
2 cups whole wheat flour
2 t. sugar
2 1/4 t. active-dry yeast
2 cups warm water
Mix the flour, sugar, and yeast in a clean, 2 qt. capacity glass bowl.
Gradually stir in the water and mix until it forms a thick paste and do not worry about lumps. Cover with a dish cloth such as this one from Evelyn Fields
and let sit in a warm, draft free place.
Once the starter is bubbling, feed it daily with flour and water while removing a cup of starter. You're just replacing it. I have been using 1 cup of flour and 1/2 cup water... still working on this one though.

The House Around the Corner - Bobbi Jo - Sourdough


A HEAVENLY LOAF - FROM JO'S PRAIRIE 

I have been experimenting with making sourdough bread lately and think I've found a recipe that works for us:) Here it is for those of you who were wondering.  I have to say thank you to Heather, at Mountain Home Quilts for her inspiration to start making our own bread. Check out her Etsy shop for beautiful quilts!

(If you would like to see this in it's original form, go to Jo's Prairie here.)

Bobbi Jo's Prairie Bread Recipe:

2 1/2 c whole wheat flour
3 c. white bread flour
2 1/2 t sea salt
2 1/2 t dry yeast
1 c. warm milk
2 T agave nectar
2 T butter, softened
1/2 c warm water
1 1/4 c. sourdough starter
1 egg

From a previous post:  Homemade bread has become a favorite in the this house.  The boys helped me knead whole wheat bread this afternoon and had a great time. I tried out Red Mill's ground flaxseed to make more of a "sandwhich" bread. Substituting a half cup flaxseed meal for a half cup of whole wheat seemed to be a perfect recipe:)

Directions for Bread:
In a large bowl, combine 1 c. whole wheat flour, 1 c. bread flour, salt, and yeast. Stir in milk and butter. Add starter, agave, and water. Gradually mix in the rest of the flours ( 2 c. bread flour and 1 1/2 c. whole wheat flour.

Turn dough onto clean, floured surface and knead for 8-10 minutes. Place a greased bowl and cover with damp dish cloth. *I like to use coconut oil to grease my bowls. Use your fingers to rub it on- if you have excess, just use as a hand lotion:)  Let rise for one hour in a warm place.
This is a picture of the end of this rising process. It should double in size.

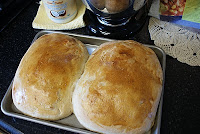
Punch down your dough and let rest for 15 minutes. Shape into loaves. Place on greased baking sheet (above picture). Let rise 1 hour. I warmed my oven today for this process and let it rise in the oven. It worked much better! Just turn the oven on low and then turn it off- you should be able to touch the inside of the oven.  Brush tops with egg wash (1 egg, beaten) and bake at 375 degrees for 30 minutes. *I use my finger to brush the egg on.  Here they are... ready for the oven!

Baker, Baker, Bread Maker!
It's very rewarding to see my son light up when "his" bread comes out of the oven.
He is so proud of himself and really enjoys that first taste test:)
Thank you, Bobbi Jo, for sharing this with everyone.  I plan to add some flax meal to my bread.  I can't wait to see what it does to the recipe I have.  I also think I will try the egg wash.  It gives it a beautiful color.  I can just SMELL it from here :)  Cindy

Wednesday, February 10, 2010

The House Around the Corner - Evelyn Fields

Melissa has been learning a lot of "old" new skills.  Sourdough bread is just one of them.  She has a lot of interesting ideas on saving money, sewing, attempting to live a life without plastic, running a small business from home and other great ideas.  If you are interested in reading her blog, go to Evelyn Fields
  
Melissa's Sourdough Whole Wheat Bread
  • 2.5 cups whole wheat flour
  • 1 cup sourdough starter
  • 3/4 tablespoon kosher salt (or 1 teaspoon table salt)
  • 1 1/2 cups warm water
  • Covered pot (five-quart or larger cast iron, Pyrex, ceramic, enamel…something that can go into a 450F oven.)
  • Sprouted Wheat Flour, if you choose.  This should be done ahead of time.  Sprouted Grain Directions
I have been experimenting with making bread with sprouted whole wheat.  I love bread but my body doesn't and I think sprouting it helps me digest it better.  It is one more process that is easy to do.. It does take a few days and you need a wheat grinder.

1. Mix dough: The day before, combine all ingredients in a big bowl with a wooden spoon until the dough just comes together. Cover with wet cloth and let sit 20-24 hours on the countertop or in the oven with the oven light on if your house is cool.

2. Shape and preheat: Dump the dough on a floured surface. Fold ends of dough over a few times with the spatula and nudge it into a ball shape. Generously dust a cotton towel (not terrycloth) with flour and set dough in it.  Fold towel over the dough. Let it nap for 2 hours or a lot longer to rise more. To know when it is done rising poke your finger into the dough, when it stops springing back from the hole you made... it it ready.


3. Bake: Pre heat oven to 450 and place empty pot in oven for 1/2 hour. Remove hot pot from oven.  Holding towel, dump wobbly dough into pot. Doesn’t matter which way it lands. Turn down oven to 400 and bake covered for 30 minutes. Uncover, bake another 15-20 minutes or until the crust is beautifully golden and the middle of the loaf is 210F. Remove and let cool on wired rack.


I made Sprouted Sourdough Rye Bread for the first time last night. It has a strong taste so it took me a few bites to start liking it but my husband LOVED it!!!


Making bread usually involves some type or rising, double rising or soaking overnight and a towel is needed to keep unwanted things off and moisture in. I have been using whatever towel I had around for covering the dough and sometimes wondered about lint on it or what I had used it for before it was washed. So I made a towel that is just for rising bread, with a cute little slice of "sprouted" bread on it.  This way it only has one purpose.  Also it looks cuter than my old/stained towels sitting out all day or night on my counter.  These new towels will be in my shop soon. 

My Sourdough Bread Recipe


I have been making sourdough bread for a while now.  Here is a recipe and some tips that have been helpful and I would like to share them with you.  I am also going to do several other recipes from some of the terrific bakers who have been working their recipes out!


SOURDOUGH BREAD

Don't forget to save some starter for the next batch - add another 2 cups of flour and 1-1/2 cups of warm water to feed it.
1 cup starter
6 cups flour**
2 Tablespoons sesame seeds
1 Tablespoon salt
1 Tablespoon sweetner
3 Tablespoons Olive Oil
2 cups warm water

These are approximate measurements.

** Currently I am using:
  • 2 cups organic, fresh ground whole wheat flour.
  • 2 cups organic, fresh ground barley flour.
  • 2 cups organic white flour
 The white flour gives the bread  a nice rise to it.  We could live without it, but at this time, I just add it.  Otherwise, it is a really, really dense loaf.  Nothing wrong with that, just at this time, I add the white - It makes it easier for sandwiches.

This makes a somewhat sticky dough that I just bring together in my Kitchenaid.  I add flour later if necessary to firm it up.  I dump the sticky dough into a glass or ceramic bowl.

Cover with a dishtowel (you can flour it up heavily so the bread does not stick to it) and leave to rise for several hours.  The cute one is from Evelyn Fields.  She has done a lot on the whole bread thing.... look at her site.  I'll list her recipe also as a different post.
I have been trying a damp towel also (trying to replace the plastic wrap I used to use).  I have to re-dampen it a couple of times while it is rising.  If I forget or it is overnight, I end up with a dry towel and a crust on my dough.  I just pat some water on the towel and let it sit for a couple of minutes, then the towel comes right off.  I then knead the crusty part right into the dough and it rehydrates it nicely.
When your dough has doubled in size, pour or scrape onto a counter that has some flour sprinkled on it.  Knead it to a nice consistency.  Add more flour here if necessary.  Shape into round loafs put on parchment paper or your baking pan and recover with the towel.

So far, if you have the ingredients, this just takes a few minutes, twice.

Let your dough rise again - it usually takes about an hour.  Heat the oven.  I keep messing with the temperature and time and right now am doing a long, slow bake (unless I am in a hurry - then I do 400 degrees for 25 minutes)  ...so I usually go with 325 degrees for about 40 minutes....  I also like to put a pan of water on the bottom of the oven for moisture.

When I think it is done, I pull it out, turn it over and tap the bottom.  A hollow sound indicates that it is done!

A couple of final tips.... I like to put butter on the top when I pull it out - this makes it easier to cut later.  Alternatively, you can run your hot bread under water very quickly and it should do the same thing.  I like the butter better :)  Here is my butter experiment - it was yummy - organic, raw, cultured, grass-fed butter and buttermilk. (coming soon)

Also, I am trying to avoid plastic and am getting some cloth bread bags from a friend.  You can see her bags here:   Evelyn Fields

Be patient... if it doesn't work out at first, keep trying.  It really just is a skill you need to develop.... Everyone seems to come up with their own recipe and way of doing things that works for them.  If you just keep at it,  you will know how YOUR family likes it.

Enjoy
Cindy

Tuesday, February 9, 2010

Good Fats - Bad Fats

FAT IS FUEL
GET THE HIGHEST QUALITY YOU CAN
KEEP YOUR BODY FUNCTIONING SMOOTHLY!

I am trying to force myself to focus only on good fats/bad fats this morning.  I have been reading the wonderful book by Ramiel Nagel, with a foreword by Sally Fallon, Healing Our Children.  You can read portions of it on line here:  Healing Our Children.  I highly recommend it.  The bad thing today for me is that I personally want to implement it ALL..... but that is not what we are doing.  Step by step, one thing at a time, understand one thing thoroughly, make a good decision for YOUR family based on your own research.....  OK, note to self done...  focus on FATS:

If you want a web site that has already broken this down (and they actually know what they are doing) head over to the Weston Price Foundation.  You can access their "fats" page here:  Weston A Price Foundation - Fats  They also have a comprehensive list of articles there.  Spend some time at this wonderful place if you can.  They have done such a great job.  Weston A. Price is the dentist who gave us so much of this research.  His book "Nutrition and Degenerative Disease" is the backbone of much of our knowledge in this area.

There is a wide array of fats available.  Your choice of which fats you should use and which fats you should treat like toxic waste is vital.  How you treat and use these fats is also really, really important.  Lets break those two components down to their simplest forms.

Which fats are good?

My first rule of thumb is.... Is this a food that Jesus COULD have eaten?  Or, COULD you have eaten it at the turn of the century if it was available?  This works out about 99% of the fats issue for me.  We are blessed to live in a time where we have access to fats from all over the world.  We can make really, really great choices no matter where we live.  We are not limited by region.

My second consideration is cost..... The biggest problem in this economic environment is cost (sometimes).  I would just paraphrase Ben Franklin.... Don't be penny wise and pound foolish.  Especially on fats.

A great quote someone gave me (I forgot where I got it - maybe from Nicole's summary of Michael Pollen on Oprah show) is "you can either spend it on food now or spend it on the doctor later".  His book seems really good - she ordered it and will get back to me.  You can see some of his work here:  In Defense of Food.  Although it looks like he is a vegetarian and I have some real issues with that in general, that does not mean that you can't glean some really good information from him.

So, you need good fats... Pick one and work it into your life, then pick another one.  You don't need tons of it and good, high quality fat will give you a full, satisfied feeling.  You need less of it, get the highest quality you can.  Make it a priority.  Healthy fats are like making a big deposit in the bank - it gives your body vital nutrients, enzymes, hormones and energy.  We have been sold a load of garbage for the whole "low fat" thing.

EXAMPLES OF GOOD FATS:  Organic nuts that have been soaked to remove phytates and enzyme inhibitors, organic coconut and coconut oil, Cod Liver Oil, expeller pressed sesame oil and flax oil, avacados, cold pressed olive oil, organic butter, cream, yogurt and cheese (preferably raw and cultured - update coming on this), organic bone broth with the fat-made from grass fed animals, lard, suet, tallow and other animal fat from grass-fed animals.

There are others.... just spend some time researching and making good decisions for your family.

Which fats are bad?

Again, I have a rule of thumb... If I cannot pronounce it, if it is a chemical concoction made in a laboratory, if it never degrades, if it is industrially processed..... These are treated like toxic waste in our house.  Here are some, but not all of the words to watch out for:  margarine, hydrogenated fats, intersterified fats, partially hydrogenated fats, trans fats and magnesium sterates.

In my opinion, the biggest problem with these fats is the enormous resource your body needs to deal with them.  Your body either has to eliminate or store them.  Both are like overdrawing your bank account.  You have now eaten something that takes more energy than it gives you to deal with it.  You have less energy for healing, repair and energy, along with all of the other functions that your body needs to do.

What about Cholesterol?  If you are dealing with cholesterol issues, I would suggest you do some research.  Here is a page that could be a good starting point for you:
It is an interesting site.  I make no suggestions to you, but please know that we have dealt with this issue personally and very successfully using a diet rich in fats, enzymes, fresh vegetables, eggs, whole grain sourdough breads and lacto fermented drinks.... pretty much what we are trying here.

Just for fun:  One of our favorite new snacks is sourdough bread with raw butter and sauerkraut - It is intense, but good.  

My final thoughts:  Don't be afraid of healthy fats - go after them with enthusiasm, avoid unhealthy ones like toxic poison, avoid fats that have been heated too much - this can ruin much of the good available in the fat.  Good fats can bring comfort, pleasure and a satisfaction and enjoyment of food that nothing else can. 

Be Blessed and Healthy
Cindy

Monday, February 8, 2010

Sauerkraut for four gallons

Directions for 4 gallons of sauerkraut:  This is the size of crock I have - adjust for your size of container.  Also, this batch is for our family.... I added beet greens, apple, black peppercorns, carrots and some parsnips.  This is what I had in my fridge, so this is what I cultured.  That is why it looks so colorful.  Yours might not be so many colors and flavors.... we like intense.

#1 - Gather ingredients:  6 heads cabbage, 9 tbsp or more sea salt, whey, (directions here: Whey recipe)   juniper berries or caraway seeds, and any spices you like.  Spices are INTENSE when cultured, so use with caution.  Our family likes cumin, cayenne, and onions.

#2 - Shred the cabbage. Use a food processer if possible. Reserve the outer leaves to top it off. You need at least 8-10 leaves.

#3 - Mix as you go - I usually put the first bunch of shredded cabbage, some of the salt, and all of the spices in the bottom and mix with my hands. I then continue to mix as I add more and more of the cabbage. This allows the salt to pull the juice from the cabbage.

#4 - If you want to add spices - 1/3 cup of Juniper Berries, 1/4 cup whey, 1/3 cup cumin, 1/4 cup cayenne. If you have someone in the house that likes bland and someone else likes spicy, you can leave the cayenne out and put about 1/4 tsp in each jar as you bottle it.

#5 - Layer some outer leaves of the cabbage on top of your mixture. Don't wash them, just rinse. The white stuff is what you want to culture your sauerkraut.

#6 - If necessary, add salt water to top off. Liquid must cover the cabbage and leaves - If there is not enough cabbage juice, just add salt water (1 tbsp per quart of warm water)

#7 - Put a dinner plate upside down on top of the whole leaves. Put another plate upside right on top of that. Push everything down using the plates. The sauerkraut cultures in the absence of oxygen, so this is how you keep it away from the air.

#8 - Put some more salt water into a 1 gallon zip lock bag or glass container that is sealed tightly.  If you are using a zip lock bag, put the first bag into another zip lock bag.  Put on top of the plates as a weight. You use salt water in case it breaks (which happens more often than not to me-that is one reason I switched to glass) Then you don't ruin your brine.

#9 - Cap your sauerkraut and put it into a cool, dark place for a few weeks. (ideally between about 55-68 degrees)

#10 - When you are ready to bottle it up, undo everything carefully and try to get all the scum or bloom off of the top. Work at the sink. Have a clean rag to wipe the sides of the bucket. It stinks - but not for long!

Bottle up and top off with the brine.  Cap tightly and put into refrigeration to "put your sauerkraut to sleep".  The smell does go away!


Have lots of fun and take some pictures. It is a totally messy, family friendly project.

Enjoy!

Cindy

Sunday, February 7, 2010

Culturing my Raw Milk - For the First Time

I went yesterday and bought raw cream and raw milk - $15.00 and some creme fraiche ($5.79 - a one time purchase, I hope).  This afternoon I got some Kefir beads from Arleen.  I now have my very expensive, nutrient dense, healthy, full of good fats milk SITTING ON THE COUNTER!

For some reason, this is making me a little nervous.  I don't know why.  I know the science behind culturing - I have a counter full of food being happily preserved this way..... I know the reasoning - I am trying to preserve food without killing off the enzymes and nutrients AND I am adding another cultured food for gut health...... I want to make cultured butter tomorrow and I want to use the cultured milk all week.

I am still a little nervous.  I am envious of all of you younger Moms trying these old/new ways to feed your family.  When you find out some new information you can change without changing 50 years of habits.  I have never in my life left milk on the counter overnight deliberately.

I am putting the steel cut oats out to soak as soon as I finish my late night musing.  Every bit of milk we have in the house is sitting on the counter.  Hopefully by tomorrow, I will have a new reality... like I learned with the sauerkraut, the ginger ale, the beet kvass, the sourdough bread, the pickles, the peppers, the really good tortilla recipe I accidentally stumbled upon (recipe to follow... hopefully tomorrow) .... all preserved with culturing - allowing the good bacteria to overwhelm the bad bacteria.  I know it in my mind, but tonight, it is a challenge.

Lets hope for the best.

Note:  I am having some of the cream cultured with creme fraiche this morning in my coffee.   It is a little different taste and texture, but good.  I think I will like this one.  The raw cream goes sour too quickly otherwise.  I will save some of this cream for a "starter culture" for next week's cream.  Later today I will make cultured raw butter out of most of this, and save some for my coffee.

If you try this, be sure you save a "starter" for the next time.  That way you don't have to buy another container of creme fraiche and can save some money.

Phase Two - Figure Out the Fats

Step One - Think about putting good fats back into your diet. These are some of the best, most nutrition packed energy calories you can find.  Some examples would be Coconut Oil, Olive Oil, Butter, Nuts, Cod Liver Oil, Fish and Avocado are a good place to start.

Step Two - Take a deep breath and consider raw, unpasteurized, un-homogenized dairy products (from grass fed beef, if possible).  Don’t get overwhelmed, but spend a little time studying the benefits of this type of dairy product.  You need to make decisions for your family, but good milk, butter, cheese and sour cream are critical.  Try to find local sources of raw dairy, especially grass fed dairy.  Can your family go on a field trip and taste some of this fresh stuff?  That might be a good way to start.

This is the power base from which healing comes.  Throw out what you know about “fats” and study some of the benefits of these good fats.  Now, that your gut can utilize these foods properly, use them.  Your grocery dollars are well spent here.  Get the highest quality, least processed most organic, freshest fats you can get, then get them into your body. You are far better off using half the amount, at twice the price, of these products.

If you are going to try raw milk products, you might consider learning something about the process of culturing them.  Otherwise, they do not stay fresh very long and culturing raw milk products adds a wonderful, healthy layer of enzymes and good bacteria to continue your quest for a healthy gut.

Step Three - Think about making a switch to grass fed meat.  The benefits cannot be overstated.  Most animals were not designed by God to eat massive quantities of grains.  This is an invention of an industry that wants to maximize profits, which is fine, but not at the expense of our family’s health.  You might consider watching Food, Inc. to get you going on this one...  :)

Step Four - Begin to think about and eliminate bad fats that your body cannot use.  It takes so much energy to get rid of these fats that you are better off not using them.  This would include margarine, hydrogenated fats, intersterified fats, partially hydrogenated fats, trans fats, magnesium sterates in supplements and potentially some other fats.  Do I dare mention French Fries here… dipped in Ranch Dressing? Nope, OK.  One good suggestion is to make cultured mayonnaise.  It is quick and easy and combines healthy fats with cultured foods.  It has already been discussed here:  Recipes

Step Five - Begin the process of working the good fats into your day-to-day life.  This might include writing out a menu (with fats included), working out a reasonable plan for when you eat out, taking some time to read and study about the different fats, making decisions about your grocery dollars or just beginning to learn new flavors.  Continue to maintain your gut health.  Purchase some really good, high quality dark chocolate and allow yourself a little of that every day. As you add really good fats, your desire for sugars and processed foods will begin to subside.  With a healthy gut and good fats, allowing yourself some dark chocolate might help you wean yourself off some of the more unhealthy foods you love.

Many of these fats and flavors are very, very satisfying.  When you have a good variety of fats in your body, you begin to naturally lose some of the old cravings. The flavors can be intense and different, but if you just accept that different is not necessarily bad, you will be fine.  Don’t make too many changes at once.  Just one change at a time.  Talk with your family about these changes.  The more understanding you have, the harder it is to go back to the old ways.

GROCERY STORE TIP:  Read Labels!  If it says Hydrogenated, Intersterified, partially hydrogenated, trans fat, don’t buy it.

LIFETIME FITNESS TIP:   Find a controlled exercise for at least two days per week.  It should include some type of breathing control.  I recommend DVD’s.  Think Yoga, Pilates or Tai Chi.  Something like that which builds core strength, flexibility and forces controlled breathing.  Again, 20 minutes.  Can you block out the same time each day?  It is a wonderful use of your time for your family.  You are not being selfish, but giving your family the gift of a healthy parent, grandparent or great-grandparent (I would like to play as hard with Ryden’s kids as I do with him).

These two liftetime fitness steps  (from Phase 1 and 2) help with so much…. Brain health, gut health, muscle tone, detox, systemic anti-fungal..... the benefits are endless.

Best of Health
Cindy

Saturday, February 6, 2010

The House around the Corner - The Bee Hive - Food, Inc.

I am starting another "label" called "The House around the Corner".  This is for links to blogs of people I know who are on similar journeys.  We do not all have to do the same thing over and over.  Yesterday I posted a link to  Evelyn Fields blog.  She has so many good ideas and is so creative and practical.  I had a real need for a way to store and transport my sourdough bread in a non plastic way.  I am NOT creative, but she was able to do a great job and posted a picture and some thoughts.

My friend Jody watched Food, Inc. a while ago and wrote about it on her blog.  With her permission, I am going to lift a couple of paragraphs from her blog.... if you want to know more, just go here:  The Bee Hive - Whats for Dinner.

From her Blog...

This is just a small break down of what goes into the beef. Once you start researching, you will be overwhelmed with the conditions of the animals and the process in these factories…The motivation that prompted me to write this post was after Daddy Mock and I watched Food Inc., … a very important movie to watch, I highly recommend it. It is extremely eye opening and even if you have done your research and already do believe in consuming food in it’s most natural state, you can learn a lot about the CAFO’s and how our government is involved.

This post was strictly about beef, but the same story goes for poultry and pork (which we don’t consume). The best you can do now is to buy free-range, organic chicken… grass-fed beef is hard to find, but if you ask around at your local farmer’s market, there should be some contacts that can send you in the right direction. Don't get me started on corn and soybeans... 90% of soybeans in America are GMO... and there is a ton of politics behind the soy industry, which has stripped away virtually all rights of soy bean farmers (as stated in my candle post)...
Our family, personally, is continuing on our quest for a simpler, more natural lifestyle where we produce more than we consume.  To that end, we are going to invest some time and energy in developing our orchard to a better pasture with clover and various seeds... then we are going to raise heirloom meat chickens to go with our egg chickens.  The meat is darker, takes longer to raise and is going to be a process to learn how to deal with getting the chickens into the pot.... but that is what we are going to do.  I would strongly recommend you look around in your life and see if you can be more natural and simple.

Somewhere we, as neighbors, have to quit relying on the Federal, State and Local government to tell us what we can and cannot eat.  What kind of politically correct system  is it that has stayed silent as our food has become more and more over processed and devitalized?  What kind of system is it that uses the American population as guniea pigs for their agribusiness experiments?  What kind of idiots are we that allow our "government watchdogs" have an incestuous relationship with the business and industry that they are supposed to be regulating?  It just hasn't worked out that well, has it.

I want to be the kind of neighbor that can produce healthy food and share it with friends and neighbors because I have more than I need... and the kind of neighbor that cares that the food I produce is healthy and nutritious and life-giving.  The dead and health robbing food that is FDA approved is garbage.  Why are they able to tell me that I cannot eat food with good, healthy life in it?  Something is wrong with this system here.  However, I am grateful that there are a lot more choices available then there used to be, and I will just continue our own personal journey of simple and wholesome foods.


Both blogs that I have listed here journal some of the roadtrip for these families as they have moved into simple and natural choices for their family.  Please enjoy them, learn from their journey and let me know how your own journey is going.

Best of Health
Cindy
My apologies for moving into political rant :)  
I shouldn't be watching Fox News as I am writing this.......

Friday, February 5, 2010

Raw Milk Yogurt

Full disclosure - I have never made raw milk yogurt myself.  I plan to try it soon.  I understand it is more runny than the yogurt we are used to.  If anyone tries it, let me know.  It would be good if someone worked all the details out for all of us  :)
  • Obtain some raw milk, produced in a clean, healthy environment by healthy cows or goats... grass fed is by far the best.  Ideally, the raw milk for raw milk yogurt should be as fresh as possible.

  • Heat one quart of raw milk to 110 degrees F as the first step to making raw milk yogurt. Remove from heat source after reaching 100 degrees.

  • Add 2 tbsp. of live culture organic yogurt for your starter. Any organic, preferably (but not necessary) yogurt is a very good choice as a culture to make organic raw milk yogurt. Use a whisk to incorporate the yogurt into the heated milk.

  • Pour milk into a quart-size mason jar or other glass container.  I understand that a thermos works really, really well for this. Cover the raw milk yogurt with lid.

  • Leave the raw milk yogurt in a warm (110 degrees F) place for eight hours. (thermos or yogurt maker or maybe a dehydrator or crock pot)
  • Place your raw milk yogurt in the refrigerator to cool.

  • Enjoy your yogurt. Add chopped fruit, homemade fruit preserves or vanilla extract and maple syrup to the raw milk yogurt if desired.
Some links for your reading pleasure.  I know this is a lot of links, but this is a terrific subject to really mull over.  Spend some time, think it over... try one or two recipes, share the experience.... make good decisions for your family.... own it, share it, live it and move on.

The Weston A. Price Foundation

Organic Pastures

Recipes from Weston A Price Foundation

Kelly the Kitchen Kop

Home Cooking

Best of Health
Cindy

    Links for purchasing assorted cultures

    It is very possible that you can share good milk (and other) cultures with someone in your community, but if that is just not possible, then the best thing is probably to order some.  I have never used these sites, but am listing them for your convenience.

    For the most part, I just try to buy a sample of whatever I am making.  Julie just let me know that they have creme fraiche at Save Mart, so I will go buy some and use it for my starter.  I am looking forward to making some with the raw Organic Dairy cream and using it in various ways.  I love to try new things.  :)  :) :)

    Anyway:

    Gem Cultures
    Kefir Lady  (also lists benefits for kefir)

    Also, here are a few sites for cultured milk products and their benefits.  Hope there are not a bunch of pop up ads.  Those are really annoying :(

    Backwoods Home
    Functional Foods

    And a thesauraus of cultured milk products..... gotta love google :)

    Cook's Thesaurus: Cultured Milk

    Best of Health

    Cultured Milk Products

    As a part of gut health, cultured dairy products have a huge role to play.  They will also play a prominent role in Phase 2 Good Fats/Bad Fats, so this is a transitional "Extra Step".  I have already covered some of the benefits of cultured milk products.  I would like to you to try one or more of these yourself.  It is a good way to incorporate raw milk into your life.

    I confess, I might be at my time limit for cultured products, but really, I think I need to just add a block of time mid-week to rotate half of my cultures, then use my regular Saturday morning to rotate the other half.  This way, I can have cultured, raw milk products on hand for snacks and meals.  Thankfully, my counter is big.  Also, I am trying to go with very simple and wholesome meals to help with time management.

    I am finding our nutrient dense meals to be very satisfying, if quite simple.  A soup, made with bone broth, a little meat and some soaked grains... some sourdough whole grain bread with raw butter.... a green salad with oil and vinegar dressing (I have been adding sauerkraut juice to this - it isn't bad).  Simple, filling, easy to prepare and clean up.  What more could you want for a dinner?

    Anyway... on to the cultured milks.  Before refrigeration joined us in our industrialized lives it was a lot more common to culture milk before consuming.  Consuming large amounts of uncultured milk was rare.  Yogurt, cheese, clabber, curds and whey were used to effectively prevent milk from spoiling.  Through the process of lacto fermentation, friendly bacteria breaks down both milk sugars (lactose) and milk protein (casein).  This process effectively inactivates the spoiling bacteria and allows your milk product to be preserved for days, weeks... or in the case of cheese, years.

    The process of lacto-fermentation also predigests these milk products and allows the nutrients to be easily absorbed by your body with less energy.  Also, these live, culture dense foods help colonize good bacteria in your gut.   Although I have listed yogurt in Phase One as a simple and easy way to begin, there is an amazing variety of cultured milk.

    If you are able to study the homogenization and pasteurization process, it might help you understand the benefits and drawback yourself.  I have listed a couple of pages from raw-milk-facts.com for you to look over.

    Raw Milk Basic Facts
    raw-milk-facts.com - homogenization
    raw-milk-facts.com = pasteurization

    *note: When dealing with live bacteria, keep in mind that some good bacteria may have names that sound like bad bacteria. Streptococcus, for instance, can be a beneficial bacterium, although most people think of strep throat when they hear the word. Streptococcus refers only to the shape of the bacterium, and has nothing to do with its ability to promote health or cause disease. (Strept means 'twisted" and coccus means "round.") Streptococcus thermophilus has been safely used for centuries to make cultured dairy products such as yogurt, and cheeses such as Mozzarella.

     Some of the various types of cultured milk are:

    Yogurt - which is made by first heating milk and then adding a culture... then allowing the culture to develop.

    Kefir = a slightly effervescent beverage made from milk.  My friend Jamie is going to buy some Kefir grains from the GEMS website and give it a try.  She agreed to take pictures and let us know how it is going and what she learns.  I am looking forward to that.

    Creme Fraiche - a cultured cream product - you can also use it to make a cultured raw butter.  It is apparently wonderful in soups and sauces.  I have not tried this product myself, but plan to soon.

    Cultured raw butter needs no salt and has a high enzyme content which makes it really easy to digest and a flavor that is amazing.

    Cream cheese and cottage cheese are traditionally made by allowing the fermentation process to continue for several days until the curds (the casein containing part of the milk) separates from the whey. 

    Further inoculation and fermentation turns the cream cheese into cheese.

    Whey is a valuable activator used in other fermented foods and beverages.

    I will list recipes for each of these milk products separately.  This way, they are easier to find.  I hope some of you will find the time and energy to acquire some raw milk and try some of these.  If you can't do raw, try the unhomogenized.  If you can't do that, try organic.  Take baby steps and do what you can.  Try one new thing.  Find a recipe and make it a family project.  Most of these are quite easy..... just requires some time and attention.

    I am enjoying the "slow foods" movement, where foods are thought out 2-3 or more days in advance.   Although there is nothing "instant" about these foods, if you have a wide variety of them on hand, they are wonderful, live and right there in your fridge for your use.  To be frank, I find that the actual preparation on a day to day basis requires a lot less time.  It is a process.

    Best of Health
    Cindy

    Cool Bread Bags

    I have been working really hard on a couple of things in our own household.  One is trying to get away from plastic (easier said than done) and the other is making my own sourdough bread.  After you make a beautiful loaf of bread, what do you do with it???  Another problem I have is trying to take bread anywhere. 

    I asked my friend to consider making some kind of cloth bag for me.  Here is what she came up with.  I love them.  You can find them here:  Evelyn Fields: Homemade Bread Bag

    Thanks sweetie.  You are the best.  Problem solved!

    Some further thoughts on gut health

    Hopefully, some of you have made good progress in learning how your gut works, why it is important, how to begin the healing process and how to continue this process as a lifetime project.  I came across a really nice article that does not have a million ads (that I could see) that again spells this process out.

    I would urge you to continue to study and learn as much as you can.  I do not believe you can be healthy if your gut is not working properly.  I do not believe you have to spend a fortune to have a healthy gut.  I do believe you should learn how to do a wide variety of lacto fermented foods to populate your gut with good bacteria.  If you have an overgrowth of candida, yeasts, fungi, or other nasty stuff, you will probably need to weaken them.   Find out what makes bad organisms strong (sugars, simple carbs, processed foods, a pH system out of whack) and what makes good bacteria strong (a neutral pH gut, some good minerals and vitamins, good fats and whole foods, lacto fermented foods).  Focus on the healing aspects.

    This is just a starting point.  There are endless variations on these themes.  Learn different foods from different cultures.  Incorporate foods your great-grandmother would have made.  Learn some forgotten skills.  Spend your money on good food, not doctor visits.

    The following link is a beautiful page that is well laid out and well thought out on gut health and disease.  I think you will find it valuable and non-annoying.  It is one of my new favorites.


    Finally, I found a great quote from a website on raw milk.  It is just so good I wanted to put it into this article on gut health.   From the article:

    A Word About Diet In General

    Use common sense and stick with whole, unprocessed foods, free from genetic tweaking (there's still just too much conflicting information out there on that topic), and you'll likely be ahead of the game.

    Cook your foods minimally, and you'll be even better off. Learn about sprouting and fermentation. Question everything before letting it past your lips. 
    Explore what worked for countless generations before ours, and put it to work for yourself today. You can achieve great health by diet alone. I've done it, and so can you!


    Best of Health
    Cindy